分类目录归档:运维

作为运维人,必懂的知识,全在这里啦

CentOS7将新增硬盘挂载到已有目录下

已知在虚拟机 VMWare 给指定服务器新增一块 100G 大小的硬盘
以 /data 目录为例,将 /data 目录挂载到新增磁盘上

0.对新增磁盘进行分区(关于 Linux 分区知识,请点击这里)
# 这里新增的磁盘名称叫 /dev/sdb
[root@localhost ~]# fdisk /dev/sdb

# 输入 m, 得到帮助,可以按照提示操作进行分区了
# 因为这块硬盘只有 100G,所以我只打算分一个区,这里是需要输入 n,然后接下来都按 Enter 键,默认即可,最后输入 w 保存退出
[root@localhost ~]# fdisk /dev/sdb
Welcome to fdisk (util-linux 2.23.2).

Changes will remain in memory only, until you decide to write them.
Be careful before using the write command.

Command (m for help): m
Command action
   a   toggle a bootable flag
   b   edit bsd disklabel
   c   toggle the dos compatibility flag
   d   delete a partition
   g   create a new empty GPT partition table
   G   create an IRIX (SGI) partition table
   l   list known partition types
   m   print this menu
   n   add a new partition
   o   create a new empty DOS partition table
   p   print the partition table
   q   quit without saving changes
   s   create a new empty Sun disklabel
   t   change a partition's system id
   u   change display/entry units
   v   verify the partition table
   w   write table to disk and exit
   x   extra functionality (experts only)
1.将分区后的磁盘格式化成xfs类型
[root@localhost ~]# mkfs.xfs /dev/sdb1
2.创建临时挂载点至该硬盘上
[root@localhost ~]# mkdir -p /mnt/data
[root@localhost ~]# mount /dev/sdb1  /mnt/data

# 查看有没有挂载成功
[root@localhost ~]# df -h
Filesystem           Size  Used Avail Use% Mounted on
devtmpfs             7.8G     0  7.8G   0% /dev
tmpfs                7.8G     0  7.8G   0% /dev/shm
tmpfs                7.8G   11M  7.8G   1% /run
tmpfs                7.8G     0  7.8G   0% /sys/fs/cgroup
/dev/mapper/cl-root   45G   39G  6.6G  86% /
/dev/sda1            3.0G  221M  2.8G   8% /boot
tmpfs                1.6G     0  1.6G   0% /run/user/0
/dev/sdb1            100G     0    0G   0% /mnt/data
3.将 /data/ 下面的数据迁移到临时目录 /mnt/data
[root@localhost ~]# rsync -avzP /data /mnt/data/
4.删除原来的 /data 目录下文件
[root@localhost ~]# rm -rf /data/*
5.卸载 /dev/sdb1 硬盘
[root@localhost ~]# umount /dev/sdb1
6.设置开机挂载
[root@localhost ~]# vim /etc/fstab

# 末尾追增一行 
/dev/sdb1     /data     xfs     defaults    1 2

# 保存退出
7.挂载 /etc/fstab 中未挂载的分区
[root@localhost ~]# mount -a
8.检查挂载是否成功
[root@localhost ~]# df -h
Filesystem           Size  Used Avail Use% Mounted on
devtmpfs             7.8G     0  7.8G   0% /dev
tmpfs                7.8G     0  7.8G   0% /dev/shm
tmpfs                7.8G   11M  7.8G   1% /run
tmpfs                7.8G     0  7.8G   0% /sys/fs/cgroup
/dev/mapper/cl-root   45G   39G  6.6G  86% /
/dev/sda1            3.0G  221M  2.8G   8% /boot
tmpfs                1.6G     0  1.6G   0% /run/user/0
/dev/sdb1            100G   15G   86G  15% /data
docker运行目录/var/lib/docker目录迁移

docker运行目录/var/lib/docker目录迁移

0.停止docker服务
systemctl stop docker
1.创建docker新目录
mkdir -p /data/docker/lib
2.开始迁移
rsync -avzP /var/lib/docker /data/docker/lib/
3.在docker守护进程文件中指定新的docker运行目录
vim /lib/systemd/system/docker.service
# 在ExecStart加入
--graph=/data/docker/lib/docker

4.重启docker服务

systemctl daemon-reload && systemctl start docker

5.检查docker服务状态

systemctl status docker

消除Redis启动时的三个警告

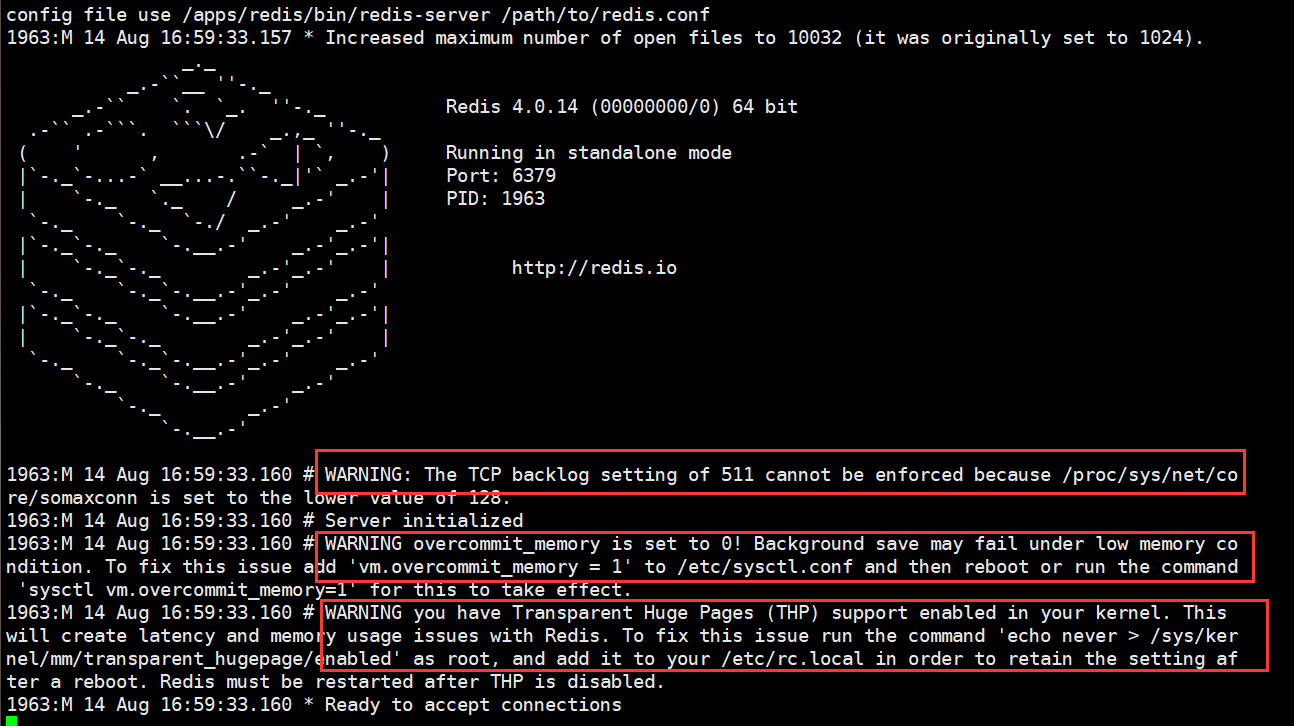
现象

问题分析

第一个警告:
  • WARNING: The TCP backlog setting of 511 cannot be enforced because /proc/sys/net/core/somaxconn is set to the lower value of 128
第二个警告:
  • WARNING: overcommit_memory is set to 0! Background save may fail under low memory condition. To fix this issue add ‘vm.overcommit_memory = 1’ to /etc/sysctl.conf and then reboot or run the command ‘sysctl vm.overcommit_memory=1’ for this to take effect.
第三个警告:
  • WARNING you have Transparent Huge Pages (THP) support enabled in your kernel. This will create latency and memory usage issues with Redis. To fix this issue run the command ‘echo never > /sys/kernel/mm/transparent_hugepage/enabled’ as root, and add it to your /etc/rc.local in order to retain the setting after a reboot. Redis must be restarted after THP is disabled.

解决办法

# 1.输入以下命令
[root@localhost ~]# echo "net.core.somaxconn = 511" >> /etc/sysctl.conf
[root@localhost ~]# echo "vm.overcommit_memory = 1" >> /etc/sysctl.conf
[root@localhost ~]# sysctl -p
[root@localhost ~]# echo "echo never > /sys/kernel/mm/transparent_hugepage/enabled" >> /etc/rc.local
[root@localhost ~]# source /etc/rc.local
# 2.启动 Redis 服务

CentOS更换中国科学技术大学(USTC)yum源

CentOS8
sudo sed -e 's|^mirrorlist=|#mirrorlist=|g' \
         -e 's|^#baseurl=http://mirror.centos.org/$contentdir|baseurl=https://mirrors.ustc.edu.cn/centos|g' \
         -i.bak \
         /etc/yum.repos.d/CentOS-Base.repo \
         /etc/yum.repos.d/CentOS-Extras.repo \
         /etc/yum.repos.d/CentOS-AppStream.repo
CentOS7 && CentOS6
sudo sed -e 's|^mirrorlist=|#mirrorlist=|g' \
         -e 's|^#baseurl=http://mirror.centos.org/centos|baseurl=https://mirrors.ustc.edu.cn/centos|g' \
         -i.bak \
         /etc/yum.repos.d/CentOS-Base.repo
update cache
yum makecache

epel

sudo yum install -y epel-release
sudo sed -e 's|^metalink=|#metalink=|g' \
         -e 's|^#baseurl=https\?://download.fedoraproject.org/pub/epel/|baseurl=https://mirrors.ustc.edu.cn/epel/|g' \
         -i.bak \
         /etc/yum.repos.d/epel.repo